When you are running reports within the software, you will generally be presented with a ‘Selection Criteria’ page.
This will allow you to specify how you want the report to run in certain ways. What options you have available in the ‘Selection Criteria’ will vary depending on the report being run.
Reporting Options/Selection Criteria
Grouping by Level 1/Level 2/Level 3
If you have set-up and grouped employees into Divisions/Departments/Locations then you can group employee data into these Divisions/Departments/Locations when running certain reports. For more information on setting up and grouping employees into divisions/departments/locations then see the ‘Company’ > ‘Divisions/Departments/Locations’ knowledge-base article.
Pay Frequency
Reports can be adapted to only include employees on the same pay frequency. If it is necessary to print the report to include all employees, tick the ‘Include all Pay Frequencies?’ tick box.

Pay Periods
A single period or range of periods can be reported using the ‘Start’ and ‘End’ drop down boxes. If the ‘Include all Pay Frequencies?’ tick box is ticked then it will run all applicable data for the tax year.
Font Size
On some reports you can change the font size to be either 10 or 6. When printing to payslip or other reporting stationery, the font size cannot be changed.
Include Leavers
When running reports, if you want to include any leavers who have applicable data to report on, then tick the ‘Include Leavers?’ tick box to include leavers in the report.
Include All Pay Frequencies
On some reports you can tick the ‘Include All Pay Frequencies?’ tick box to show all the employee data including weekly/monthly pay frequency information and all pay periods for the whole year.
Suppress Superseded
If you have ‘Back Processed’ any employees then these back processed, or ‘Superseded’ records can be included/not included on certain reports. If you choose to show superseded records on a report then these will show up with an (S) in brackets.
Tax Code Selection
On certain reports you can select if you want to include just PAYE tax codes or CIS Tax Codes (if you pay both PAYE and CIS employees in this company) then you can select which codes to include on the report:
Print Preview: This will allow you to preview the report before printing if needed.
Printer Setup: This will allow you to check printers and printer preferences on your machine/network.
Page Setup: This will you to check and set the printer page setup.
Print: This will print the report you have selected.
RTI Options
With Real Time Information you need to submit a ‘Full Payment Submission’ (FPS) every time employees are paid. When printing payslips you can choose to submit the FPS to HMRC automatically or send manually yourself later.
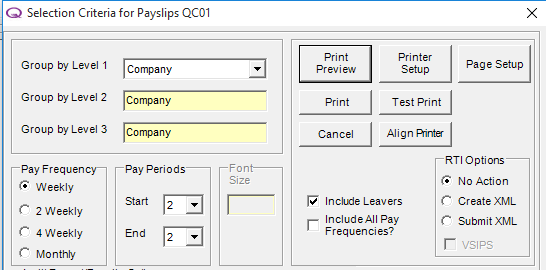
No Action:
If you select ‘Take no Action’ after printing payslips then the FPS will need to be submitted manually using either the menu option ‘Company’ > ‘Submit RTI FPS’ or the menu option ‘File by Internet’ > ‘Submit to HMRC’ and select ‘Full Submission for Pay Period’.
Create XML:
If you select ‘Create FPS XML’ here when printing payslips then the FPS submission will be generated and will need to be submitted to HMRC manually through QTAC using ‘File by Internet’ > ‘Schedule Submission’.
Submit XML:
Selecting this option will submit the FPS file automatically to HMRC. All these ‘User Options’ can be set under ‘Company’ > ‘User Options’.
Print Previewing Reports
If you want to preview a report before printing or just for checking purposes, go into ‘Reports’ and select the report required and on the ‘Selection Criteria’ screen select the ‘Print Preview’ button.
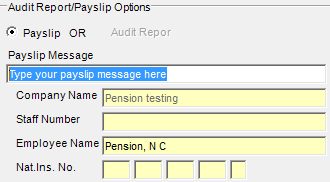
Payslip Messages
Qtac allows users to put payslip messages on their employees payslips. These appear in different places on different types of payslip and their location cannot be adjusted.
It is possible to include a small message that appears on your employees payslips. Navigate your way to ‘Printing Payslips’ where you click ‘Print Preview’ or ‘Print’. Here you can set a payslip message in the bottom left of the selection criteria box.
A little bit about us...
Qtac, a recognised payroll solutions provider in the UK, has been serving businesses for 30 years. Specializing in both payroll software and outsourced payroll services, Qtac caters to small businesses, large corporations, and payroll bureaux. Our software, recognised by HMRC, streamlines the payroll process, featuring RTI submissions, workplace pensions management, and a cloud-based portal for payslips and employee self-service. This software is supported by top-tier customer assistance, ensuring a smooth payroll experience.
Additionally, Qtac offers tailored ‘white-labelled’ outsourcing services. These services are particularly attractive to accountancy firms, as they save time, reduce stress, and mitigate payroll-related risks. By outsourcing to Qtac, companies can be confident in the knowledge that their payroll needs are being expertly managed.
Qtac's solutions are not just about functionality; they are about building long-lasting relationships with clients, offering them a combination of technology and expertise. Their commitment to adapting to client needs and providing reliable, efficient services has established Qtac as a trusted name in the payroll solutions sector in the UK. In essence, Qtac simplifies and enhances the payroll process for a diverse range of clients, ensuring compliance, efficiency, and customer satisfaction.
Need some help?
Contact SupportOur team are here to help...
|
|

